
How to Create a Google Form with AI in the FormsGen App
Yassine Jaa 7 minute read
This is the guide I wish had existed when I built the app: every screen between “I need a form” and “the form exists in my Google Drive”, in order, with a screenshot of each. It covers version 2.0 of FormsGen on an iPhone, as of 20 September 2026. If your screens look different, you are on an older version, and the App Store update is free.
Ten minutes if you read everything. About ninety seconds once you have done it once. I timed the second run on an iPhone 15 Pro: from opening the app to a published form, one minute and forty seconds, most of it spent reading the questions the AI had written.
Before you start
You need a Google account and the app signed in to it. The first launch asks for permission to create files in your Drive; that permission is the whole architecture, because the form you are about to build will be a real Google Form in your own account, not a copy on our servers. If you skipped that screen, the app has nothing to write into and every step below fails at step 6. Sign in first.
Step 1: open a new form
On My Forms, the home screen, tap the purple plus button at the bottom right. The New Form screen offers four ways in: Blank, Create with AI, Scan, and From a link, with the template library underneath.
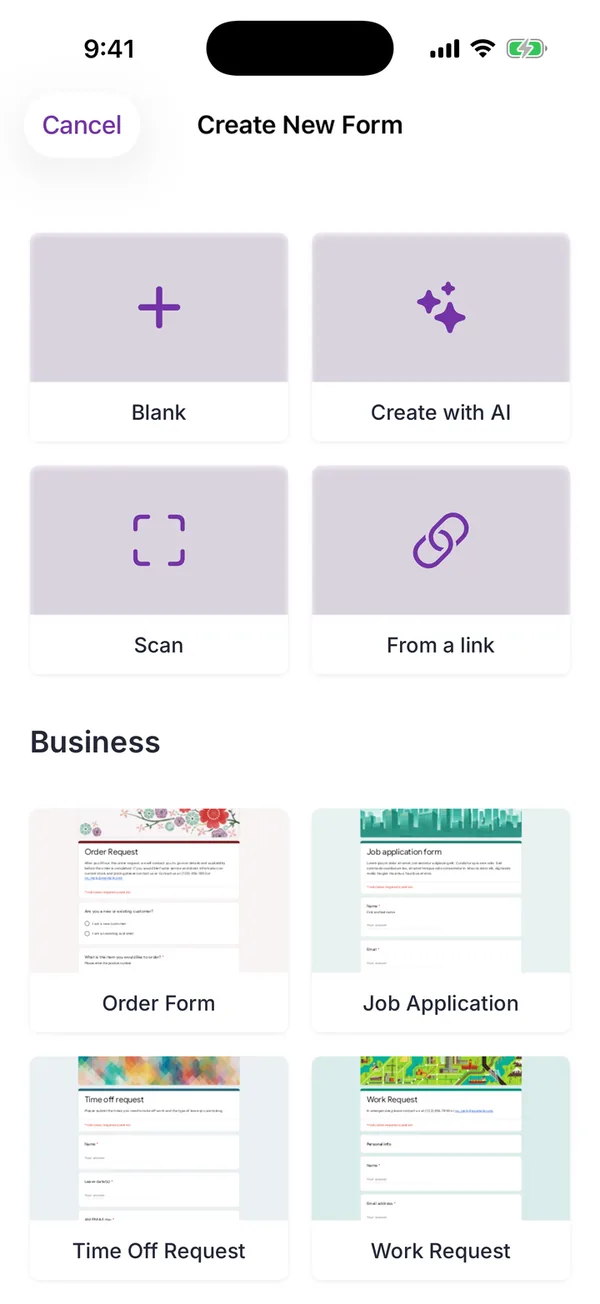
Blank gives you an empty editor, which is the right choice if you already have the questions written down. Scan is for a printed questionnaire, covered in its own guide. From a link opens a form that already exists in your Drive. Tap Create with AI.
Step 2: describe the form
The composer has one text box and four rows of chips under it. The box is where you say what the form is for. Write it the way you would explain it to a colleague, not the way you would type a search: “Customer satisfaction survey for The Green Table Café: welcome, food quality, value for money, atmosphere, how often they visit, favourite dish, whether they would recommend us, and suggestions” is the prompt in the screenshot, and it produced exactly those eight questions.
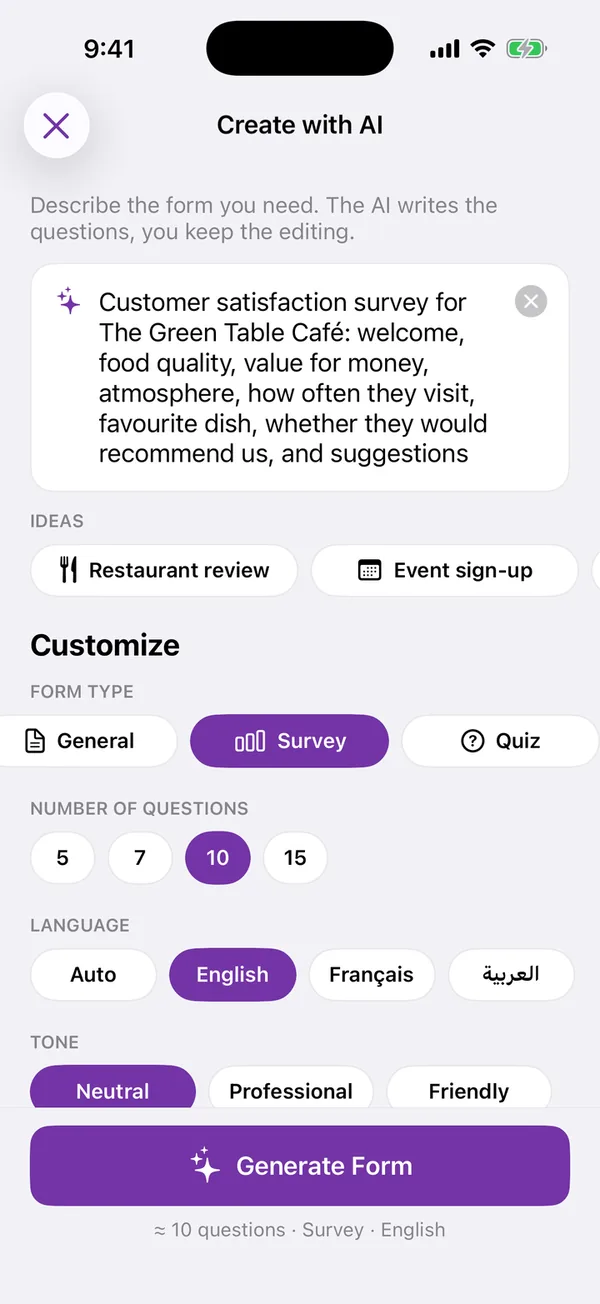
The four rows under the box decide the shape before the AI writes a word:
Form type: General, Survey or Quiz. A quiz is written with questions that have one defensible answer; a survey with questions that do not lead the respondent. Pick this first, because the AI writes them differently.
Number of questions: 5, 7, 10 or 15. My advice, from watching where responses drop off: five for anything people fill in on the way out of a room, ten for a proper survey, fifteen only for a quiz. You can delete questions afterwards, but you cannot recover the responses a long form loses.
Language: Auto, English, Français or العربية. Auto follows the language of your prompt. The questions are written in that language, not translated afterwards.
Tone: Neutral, Professional or Friendly. Professional for a customer or a parent; Friendly for a team or a class.
Tap Generate Form.
Step 3: wait about eight seconds
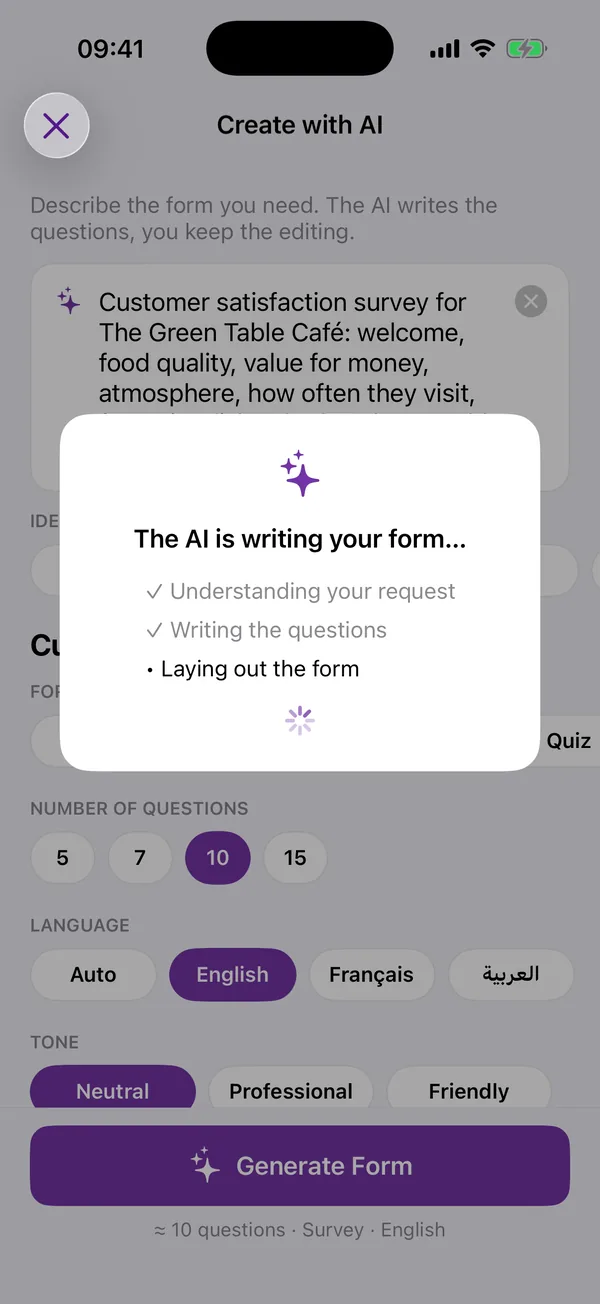
The app shows three lines while it works: understanding your request, writing the questions, laying out the form. On my phone it takes six to ten seconds. Only the text you typed and the four settings are sent, to Google’s Generative Language API; your name and account are not attached to the request, and we do not store the prompt.
Step 4: review the generated form
This is the screen that matters. The AI has written a form name, a description and the questions, each with a type: Title & Description for the intro, Scale 1 to 5 for the ratings, Multiple Choice for the frequency, Short Answer for the favourite dish, Paragraph for the suggestions. Read every question. The AI is good at the tedious part, turning a description into questions of the right type; it is not a substitute for knowing what you want to ask.
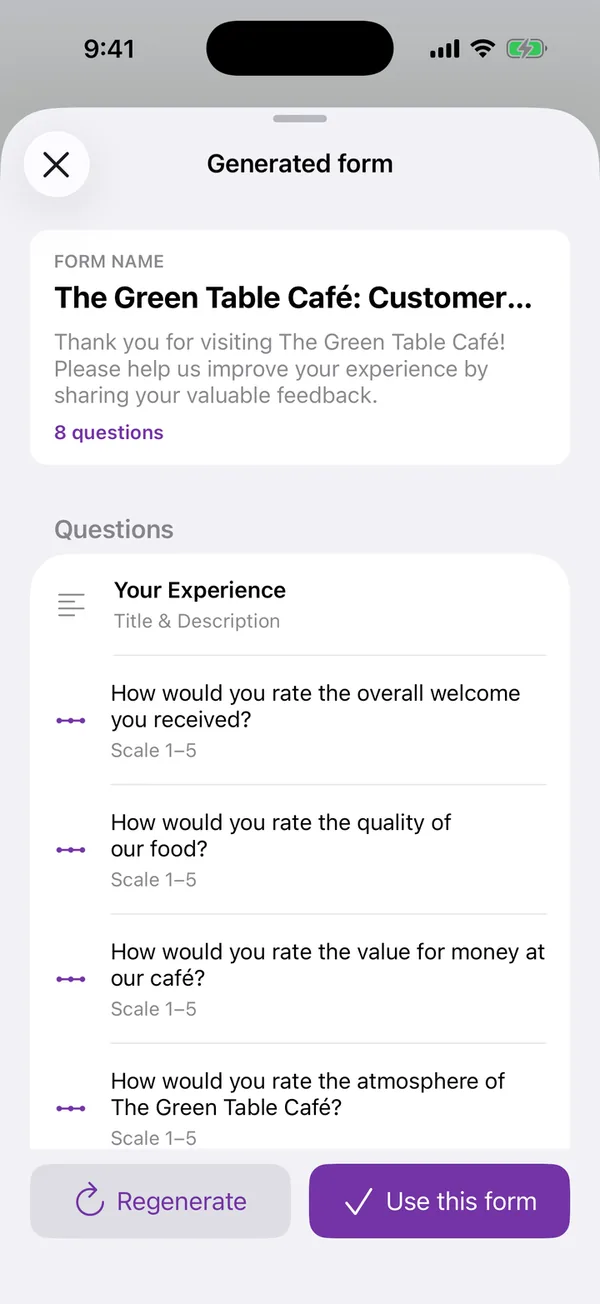
Two buttons at the bottom. Regenerate throws the whole set away and writes a new one from the same prompt; use it if the overall angle is wrong. Use this form accepts the set as it is and opens it in the editor, where you fix individual questions. Still nothing in your Drive at this point.
Step 5: edit what needs editing
Use this form opens the editor, with four tabs at the top: Questions, Preview, Responses and Settings. Each question is a card. Tap the type to change it, tap the text to rewrite it, use the handle on the right to drag it somewhere else, the toggle to make it required, the bin to delete it. If you delete the wrong one, there is an undo.
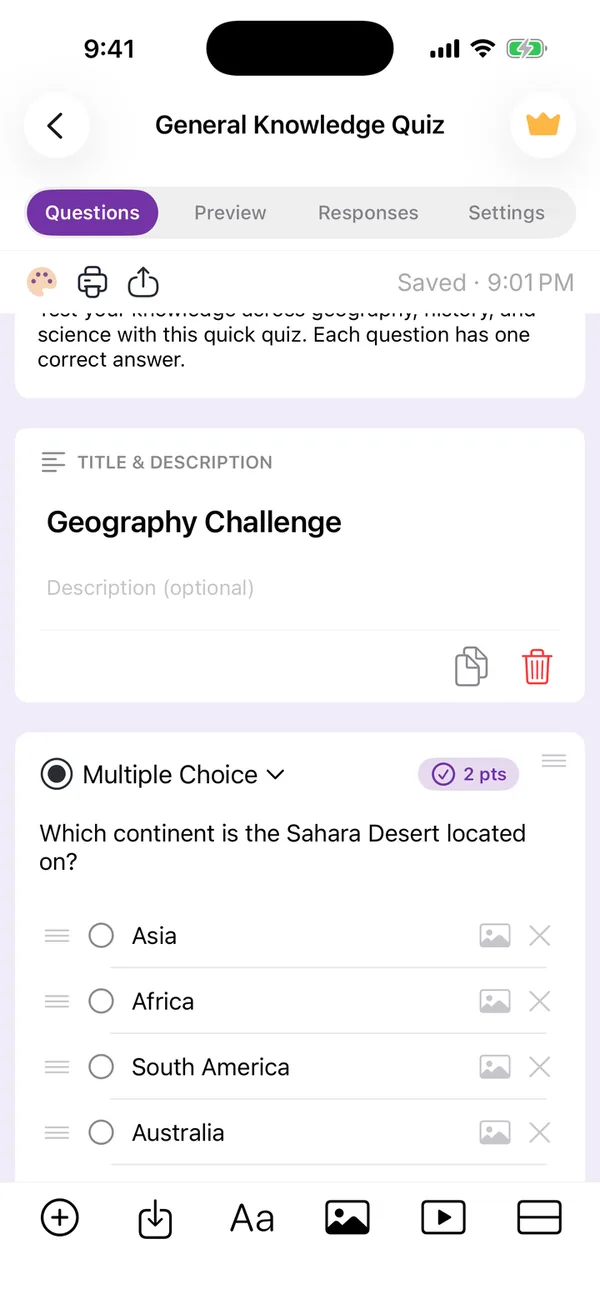
The type picker has every Google Forms type: short answer, paragraph, multiple choice, checkboxes, dropdown, file upload, linear scale, rating, the two grids, date and time. The plus button adds a question; the tool row at the bottom adds a title, an image, a video or a section. Images you add to a question are uploaded to a folder named “Forms Gen Images” in your Drive, so they belong to you like the rest.
If you chose Quiz in step 2, each question also has an answer key: tap it, tick the correct answer and set the points. Google Forms then grades every submission itself.
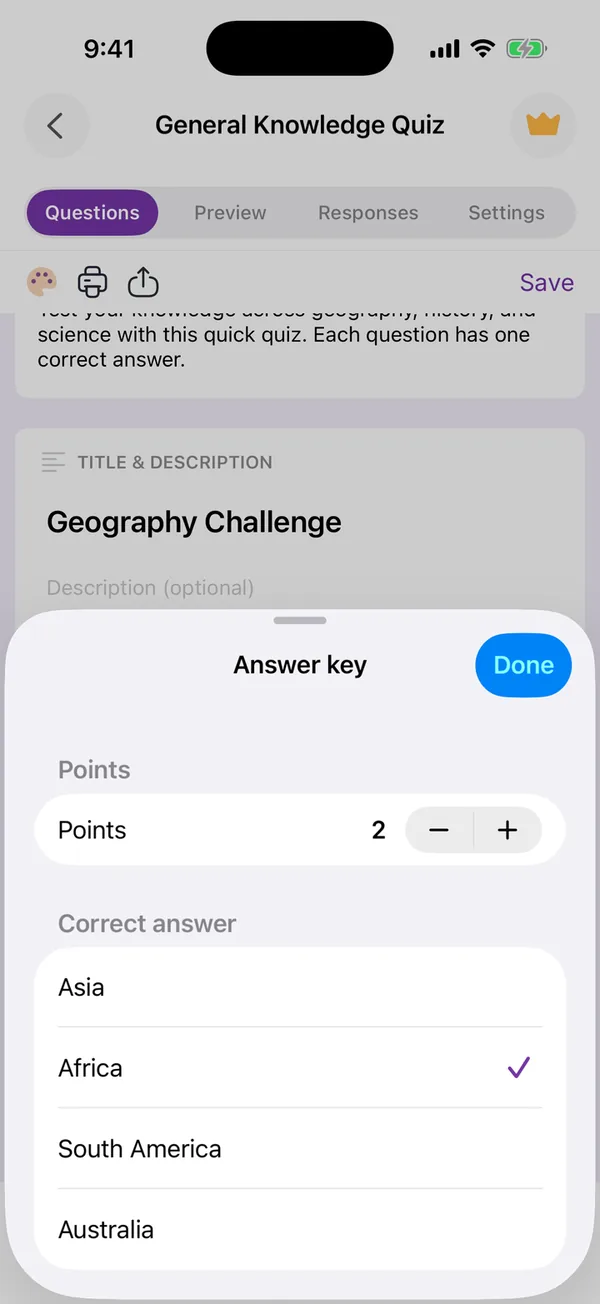
Step 6: save, and it is a Google Form
Tap Save at the top right. This is the moment the form is created in your Google Drive, with the questions, the types and the answer keys, as a normal Google Form. Open drive.google.com on any computer and it is there, editable in the Google Forms editor if you prefer, with the app’s changes and Google’s changes going to the same file.
The form is not accepting responses from anyone yet, because nobody has the link. Sharing it is the next guide: how to publish and share a Google Form from the app, by link, QR code, social card or PDF. And once the answers come in, how to read and analyse the responses without opening a laptop.
What I get wrong most often
Choosing ten questions when five would do. Every form I have built with fifteen questions has had fewer than half the responses of the five-question version of the same thing. The AI will happily write fifteen good questions; the respondents will not answer them.
Forgetting the tone. A friendly customer survey reads oddly from a bank; a professional one reads oddly from a bakery. It is one tap and it changes every question.
Not reading the preview. I have accepted a form with a question that asked customers to rate “the quality of our development team” because my prompt reused a word from a previous form. Eight seconds of reading would have caught it. It always does.
Build the form on the device you already have
Keep reading
How to Make a QR Code for a Google Form on Mobile
Google Forms does not make QR codes. Where the link hides on a phone, and three ways to turn it into a code without a laptop, with the one that encodes the wrong address.
How to See Google Forms Responses on Your Phone
Three ways to read the answers on a phone, tested in Safari, in the Sheets app and in a third-party app, with which one to use for a glance, for the file and for a real analysis.
Sharing a Google Form on a Phone: Link, QR Code, WhatsApp
Where the link hides in the mobile publish dialog, how to make the QR code Google Forms does not offer, and the two settings to check before the link leaves your phone.